Chocoflan aka The Impossible Cake

So just as an FYI I’m literally polishing off the last slice as a I write this and I’m tempted to go make another one! I made this one for Mother’s day and snuck a slice back home with me!


A little back story – I have always loved baking, ever since I was old enough I can remember being in the kitchen helping my grandma make different traditional Mexican sweet treats. When I was old enough to make them on my own, I decided I could be an entrepreneur and sell what I was making. I used to make these little pineapple empanadas (we call them turquitos– recipe coming soon!) and my aunt would sell them at her job. She would sell out every week and as a nine year old, I felt like I was living large with what I was making!

Flash forward a couple of years and I moved on to selling slices of Chocoflan! Now I remember one year being in my parents’ hometown in Mexico and selling it around to our neighbors and family! It was such a treat to not only see others enjoy what I made but then also to get paid for it – that year Chocoflan definitely supported my Mexican chip and candy needs!

So what exactly is Chocoflan you may be asking? 

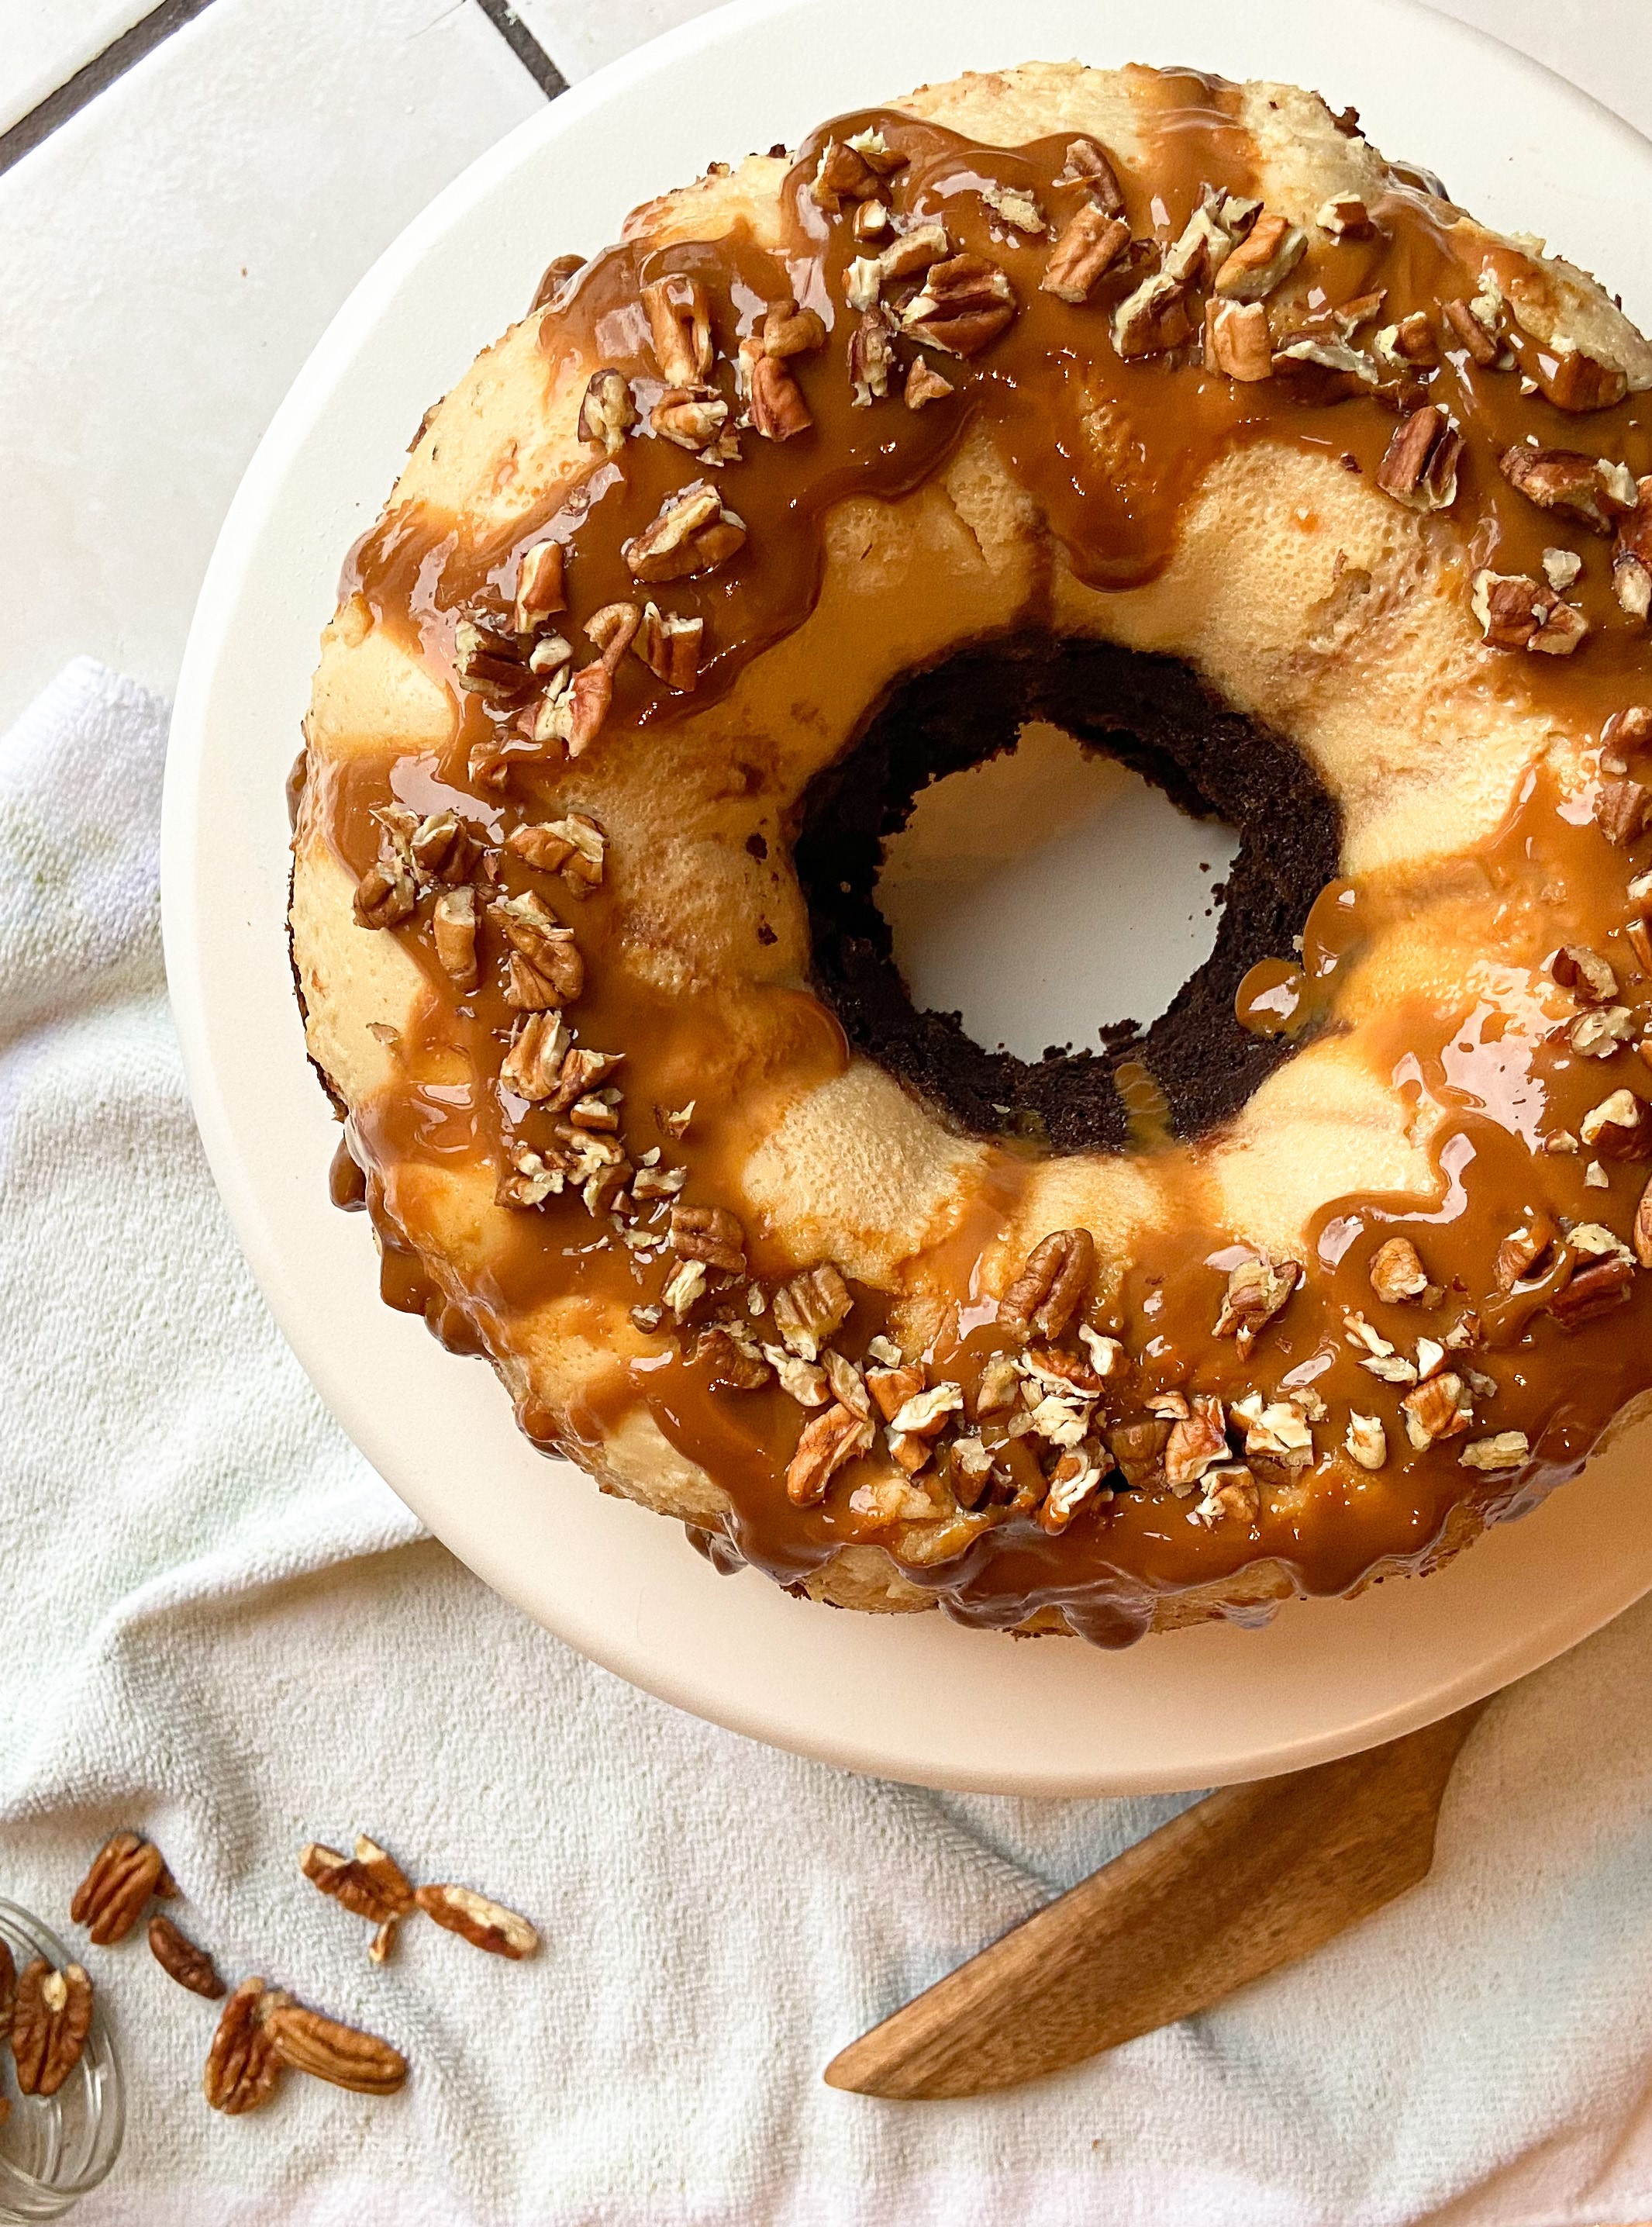
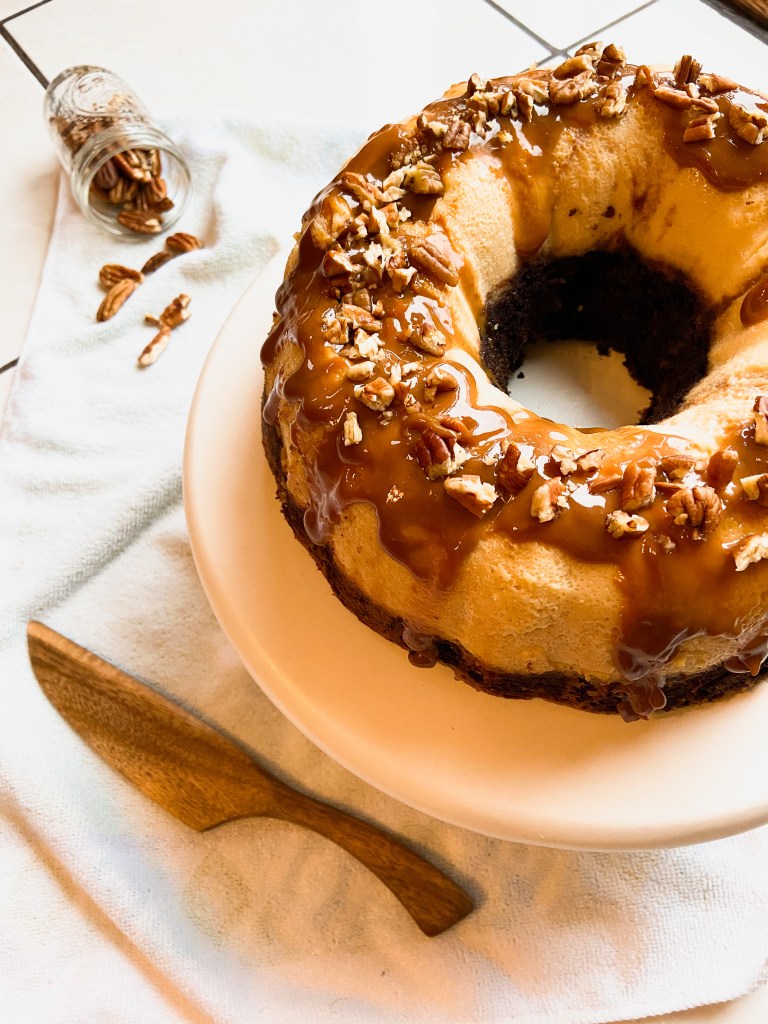
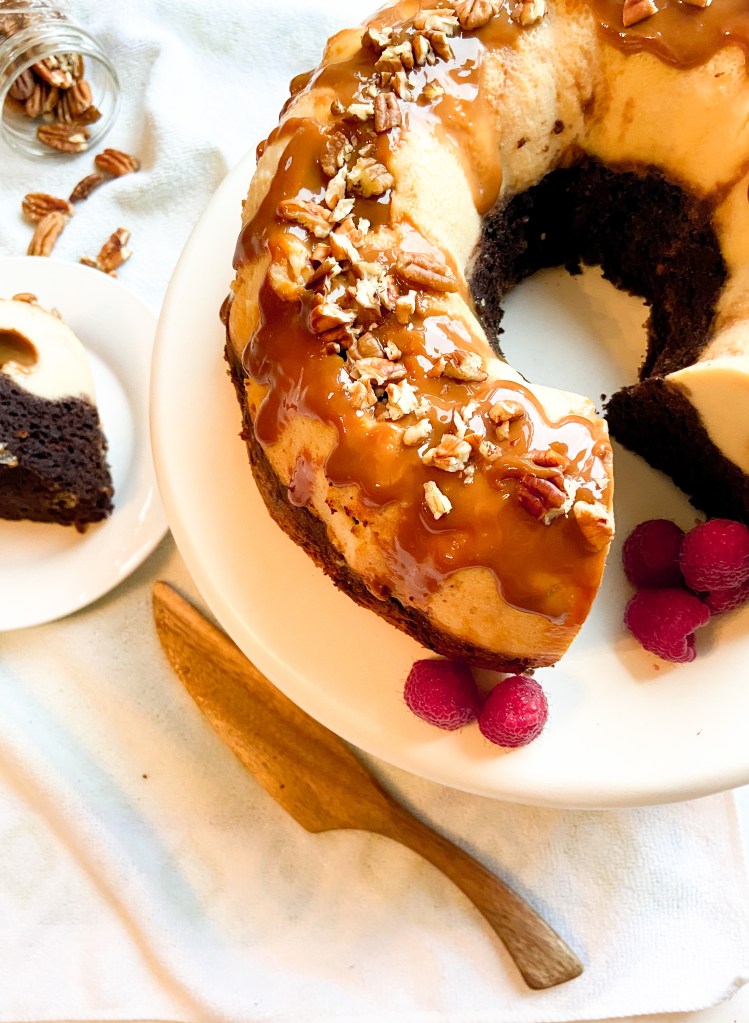
Chocoflan or what some call “The Impossible Cake” is a decadent two-layered cake in which the bottom layer is rich chocolate cake and the top is a creamy flan. Usually you will find it topped with dulce de leche, cajeta ( cajeta is like dulce de leche but made from goat’s milk), simple caramel and/or pecans. 

Although the two batters are cooked together in the same pan, they perfectly separate in the oven. When the cake comes out the oven, you’ll see the chocolate cake is all on the top while the flan has settled on the bottom of the pan! The Chocoflan is slowly cooked in a water bath, which can sound intimidating, but is nothing to worry about! 

Now recently I made this cake once again and shared it with my family during Mother’s Day. It was just as good as I remembered it and the magical separation of the two batters is just as amazing each time. I hope you all enjoy a slice of this “Impossible Cake” and are able to share it with your loved one! This recipe easily serves 8 -10 with generous slices ☺


After prepping your pan, add a layer of dulce de leche!
Add your chocolate cake layer first, and then the flan mixture!
Enjoy your finished flan!

Before you make this recipe, make sure you read it all the way through and have the necessary kitchen tools: 

  • Bundt cake pan
  • Roasting pan for the water bath
  • Aluminum foil 
  • TIME – you will need at least 4 hours before you can enjoy this creation, you can definitely make this the night before! The cook time is 1hr 20minues and needs at least 3 hours to cool before you can remove it from the pan!

Recipe

Ingredients

Chocolate Cake Layer

  • 1 box of your favorite chocolate cake mix and the ingredients it calls for – I prefer Devil’s Food Cake
  • 1 tablespoon of instant coffee – I use regular Nescafe or Café de Olla – adds a nice cinnamon flavor!

Flan Layer

  • 2 whole eggs – room temperature
  • 2 egg whites – room temperature
  • 2 tsp vanilla
  • 1 can sweetened condensed milk (I prefer La Lechera brand)
  • 1 can evaporated milk (I prefer Carnation brand)
  • 6 oz cream cheese – softened to room temperature 
  • Pinch of salt

Toppings

  • ¼ c dulce de leche 
  • 3 tbsp chopped pecans
  • Optional: whipped cream, raspberries, strawberries, chocolate sauce

Instructions

  1. Preheat your oven to 350F and grease a bundt pan realllllyyyy well. Make sure to get all the nooks and crannies. I recommend using butter to prep your pan. Set aside. 
  2. If you’re using canned dulce de leche, pour ¼ cup into a microwave safe bowl and heat up for 30 seconds to melt it down a bit. Pour into the bottom of your prepared bundt pan. Set aside.
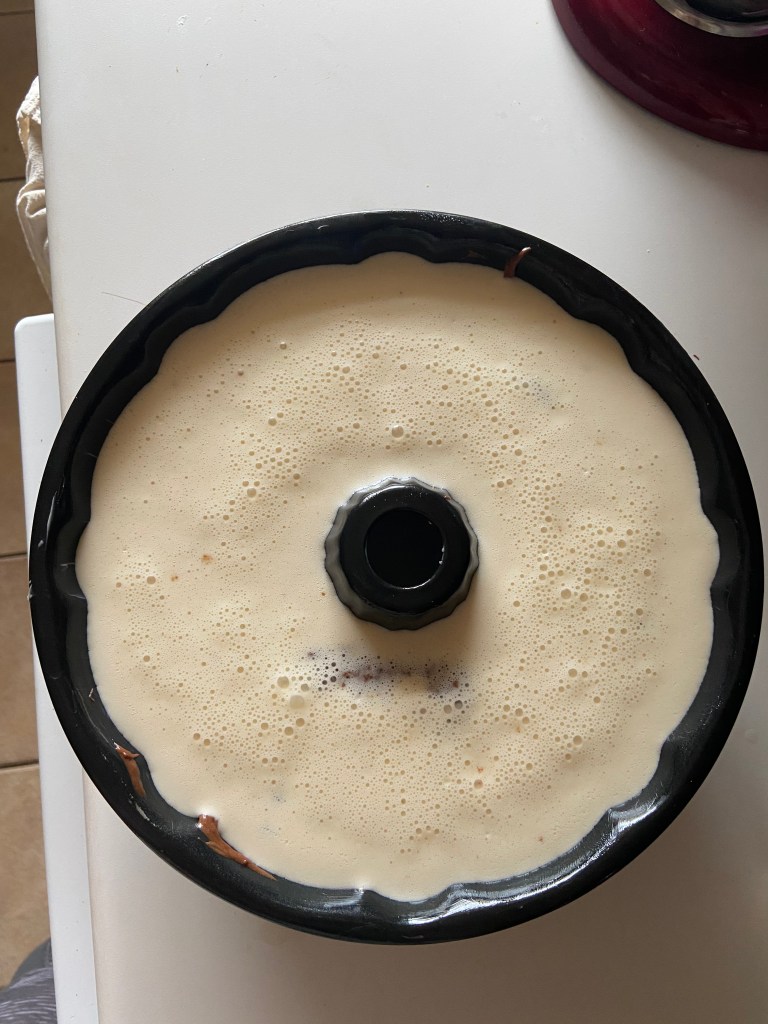
  3. Chocolate Layer – Prepare your chocolate cake mix as directed and mix in the instant coffee. Pour the chocolate batter into the prepared pan. 
  4. Flan Layer – Place all the flan ingredients into a high-speed blender until well combined. Pour the flan mixture on top of the chocolate batter. It is okay if you see them mix a little, they will completely separate when you bake it! That is where the magic happens! When it is done baking, you’ll see the flan is now on the bottom of the pan and the chocolate cake is on top so when you invert it the top layer will be the flan!
  5. Now carefully transfer your bundt pan into a large roasting pan to make your water bath.
  6. Cut off a piece of aluminum foil large enough to cover your bundt pan. To ensure the foil does not stick also spread some butter on it. Cover your bundt pan loosely.
  7. Now fill your roasting pan with about one inch of water. Transfer your roasting pan with the bundt pan in it, into the middle rack of your oven.
  8. Bake for 1 hour and 20 minutes. 
  9. After it is done baking, remove your bundt pan from the water bath and uncover it. Set aside to cool for at least three hours. DO NOT take it out of the pan until it has completely cooled.
  10. Once you’re ready to remove it, carefully run a knife along the pan to ensure it does not stick. Gently flip it onto your serving dish.
  11. Now if you’d like you can drizzle additional dulce de leche/caramel sauce (warm up it for 30-45 seconds to drizzle on top) and then add chopped pecans! This is also great with fresh whipped cream and raspberries!
  12. Store any leftovers in an air tight container in the refrigerator for up to 5 days.

flan


Lemon Blueberry Poppy Seed Bread

Looking for a spring time inspired recipe? Then this Lemon Blueberry Poppy Seed loaf is perfect for you! Loaded with fresh lemon juice, lemon zest and bursting blueberries, this is perfect for anyone looking for something bright and sweet but with a nice tart bite of lemon!

This recipe is also made gluten free by using a mix of Bob’s Red Mill Gluten Free Flour and almond flour. I have not tested other flours but I suspect you could use all-purpose flour as a direct substitute, however, do not sub in coconut flour. I also snuck in some chia seeds which mix perfectly with the poppy seeds while adding some extra nutrients into the mix.

If you want a lighter bread that’s less sweet, you could easily leave off the lemon glaze but in my opinion it adds the perfect amount of sweetness and ups the lemon flavor with another punch of fresh lemon juice and zest. Let me know what you think!


Recipe

Ingredients

Wet Ingredients

  • 2 eggs
  • 1/2 cup Greek Yogurt
  • 1 tsp vanilla  IMG_2010 (1)
  • 1/2 tsp almond extract
  • 1/2 tsp lemon extract (not lemon oil!)
  • Juice of 1 lemon (use fresh, not the bottled stuff)
  • Zest of 2 lemons
  • 1/3 cup honey 
  • 1 tsp chia seeds

Dry Ingredients

  • 1 tbsp poppy seeds 
  • 1 cup gluten free flour
  • 1 cup almond flour 
  • 3/4 tsp baking soda
  • 1/2 tsp baking powder
  • pinch of salt
  • 1/2 cup blueberries (fresh or frozen) – dusted in cornstarch or arrowroot powder 
  • slivered almonds – optional

Glaze

  • 1 cup powdered sugar
  • Juice of 1 lemon
  • Zest of 1/2 lemon

Instructions

  1. Preheat your oven to 350F and prepare your pan. I use this pan (9” x 5”)and line it with parchment paper (love this one from Thrive Market!). Set aside.
  2. In a large bowl mix together your wet ingredients until well combined: eggs, Greek yogurt, vanilla extract, lemon extract, almond extract, lemon juice, and honey. Once everything is combined, mix in chia seeds and let sit for 2 minutes. 
  3. In a separate bowl mix together your dry ingredients: gluten free flour, almond flour, baking soda, baking powder, salt, and poppy seeds. 
  4. Carefully fold in your dry ingredients into your wet ingredients. You just want to mix until well combined – do not over mix!
  5. Cover your blueberries with a thin layer of cornstarch and then gently fold them into your batter. 
  6. Pour into your prepared loaf tin and bake for 35 minutes. Check the loaf with a toothpick and if it comes out clean take out to cool. If the toothpick comes out wet, bake for an additional five minutes. 
  7. While your loaf cools, prepare your glaze. Mix together your ingredients until you have a smooth glaze. If you want your glaze thinner, you can add more lemon juice or a teaspoon of water. For a thicker glaze, add less lemon juice or more powdered sugar. 
  8. Once your loaf cools, add the glaze and add optional almond slivers if you’d like.

Notes:

  1. This is also totally delicious without the glaze!
  2. If you’re adding the slivered almonds do it while the glaze is still wet so they stick to your loaf. 
  3. If you are using frozen blueberries I recommend giving them a rinse for a minute or so and then drying them with a paper towel. This helps prevent them from bleeding through the loaf and preserves the nice yellow color of the lemon loaf.
  4. I think this would also be delicious if you swap out blueberries for raspberries! 

Recipe adapted from Ambitious Kitchen

Cinnamon Swirl Banana Bread

This Cinnamon Swirl Banana Bread has become a favorite! After making it twice in one week, I know it’s here to stay! I have a theory this would make great French Toast but I can’t manage to keep in the house long enough to try! I’ll keep ya’ll posted if that ever happens! 

Recipe

Ingredients 

  • 2 ripe bananas (the spottier/riper the better)
  • 2 eggs                                                                                  IMG_1777
  • 2 tbsp of olive or melted coconut oil
  • 1/4 c. almond milk
  • 1/4 c. maple syrup
  • 1 tbsp coconut palm sugar
  • 1 tsp vanilla extract
  • 1 c. oat flour
  • 1 c. gluten free flour (I like Bob’s Red Mill 1-1 GF mix!)
  • 1/4 c. almond flour
  • 1 tbsp cinnamon 
  • 2 tsp baking powder 

Cinnamon Swirl

  • 1/4 c. unsweetened applesauce
  • 1/4 c. coconut palm sugar
  • 1 tbsp cinnamon

Instructions

  1. Preheat your oven to 350F and prepare your pan. I use this pan (9” x 5”)and line it with parchment paper (love this one from Thrive Market!). Set aside.
  2. In a large bowl mash your bananas – you can use a fork here or let them go for a few minutes in your stand mixer. Then add the rest of your wet ingredients: eggs, oil, almond milk, maple syrup, and vanilla. Mix until all ingredients are well combined. Then add in coconut sugar and mix well. 
  3. In a separate bowl add in all your dry ingredients: oat flour, gf flour, almond flour, baking powder, and cinnamon. Slowly add in your dry ingredients to your wet ingredients and mix until just combined! You do not want to over mix the batter. 
  4. In your now empty bowl you can mix together the ingredients for the cinnamon swirl: applesauce, cinnamon, and coconut sugar. 
  5. Pour half your batter into your prepared pan and then top it with half your cinnamon sugar mixture. Swirl it with a knife gently. Pour the remainder of your batter and smooth it out. Then add the rest of your cinnamon topping. I like to add it in dollops and then run my knife through it gently to make a nice swirl on top.
  6. Place your pan in the oven and bake for 40-45 minutes, until a toothpick comes out clean!

Notes:

  1. If your almond milk is cold you may notice that your coconut oil solidifies a bit. For this recipe that should not be an issue but it can be avoided if you leave your almond milk and eggs out to reach room temperature!
  2. Room temperature eggs work best when baking but don’t worry if you don’t have time to let them sit out!